

I have had a few people ask me how I make
these little notebooks with a bike tube cover.
So I took a lot of pictures when I was making some
the other day so I could share the process.

The supplies you need are:
old bike tube
cardstock (heavy weight paper similar to a greeting card)
paper for the pages
coloured paper for inside cover (black is shown here)
waxed heavy thread for binding
(or a heavy thread that you pull through an old candle to add a layer of wax)
glue stick, scissors, clips for holding pages together,
and an awl or sharp large needle for putting holes in the paper and cover
sewing machine, thread & oil
Optional items
- stamp, ink pad, and paste wax

Cut a piece of tire tube a bit bigger than
the size of notebook (when open and laying flat) you want to make.
the size of notebook (when open and laying flat) you want to make.
Wash and dry both the inside and outside of the tubing.
Glue the tubing to the cardstock by putting a thick layer of gluestick on the inside of the tubing. Ensure you put a lot of glue right up to the edges of the tubing and then press it onto the cardstock pressing hard to ensure it sticks and you remove any air bubbles.
Let it dry.
Let it dry.
Trim the tubing and cardstock to form a rectangle
(when folded in half this will be the size of your notebook).
(when folded in half this will be the size of your notebook).
Glue the inside paper to the cardstock.
In this book I glued a black piece of paper which becomes the inside cover.
In this book I glued a black piece of paper which becomes the inside cover.

All three layers (tubing, cardstock and inside cover paper) should be glued securely.
If there are edges that are not secure, re-glue them if you can.
If there are edges that are not secure, re-glue them if you can.
If you want to add a paper decoration to the front of the book, now is the time to do it.

If you have a sewing machine you can sew the three layers together.
I always do this to ensure these covers don't come apart.
I always do this to ensure these covers don't come apart.
If you don't have a sewing machine hopefully the glue will hold the cover together.
If you try it let me know!
If you try it let me know!
To help move the rubber along smoothly as the machine stitches, I add a bit of Sew smooth oil onto the underside of the foot of the machine, and on the edge of book on the rubber side. I have used a bit of oil when I didn't have any Sew smooth.

Sew as close to the edge of the book as you can,with a large size stitch.
You may need to add a bit more oil to the underside of the foot as you sew.
You may need to add a bit more oil to the underside of the foot as you sew.

If you add a design to the front, sew around it as well.
I added a layer of paste wax to the paper with the bike stamp on it before I sewed it,
so that the oil wouldn't soak into the paper.
I haven't tried it before, but rubbing a candled over the paper may help to do the same thing.
so that the oil wouldn't soak into the paper.
I haven't tried it before, but rubbing a candled over the paper may help to do the same thing.

Now that the covers are finished it is time to prepare the pages for the notebook.
Cut or tear paper (I used a good quality paper that is slightly heavier than photocopy paper, but photocopy paper would work fine as well) the size you need to fit into your book.
Cut the pages about 6 mm or 1/4 of an inch shorter than the height (from top to bottom)
of your book, and about 1.8 cm or 3/4 of an inch shorter than the width (from side to side)
of your cover when it is not folded in half.
of your book, and about 1.8 cm or 3/4 of an inch shorter than the width (from side to side)
of your cover when it is not folded in half.

I cut about 18 - 20 pieces of paper for my book.
Fold the pages in half in groups of 6 or 7 pieces of paper, and crease them well using the bowl of a spoon or a bone folder to make the crease as tight as possible.
Ensure the pages fit into your book, and don't stick out past the cover
when the book is closed. Trim them a bit if needed.
when the book is closed. Trim them a bit if needed.

Secure all of the pages together with the clips, ensuring the fold in the middle
is as tight together as it can be, and that all edges match up.
is as tight together as it can be, and that all edges match up.
Take a small piece of paper the same length as your pages and crease it down the middle. Poke 3 holes in the crease.
One in the middle, and one about 1 cm or 3/8 of an inch from each end.
This will be your guide to ensure the holes in your pages and your cover matches up.
One in the middle, and one about 1 cm or 3/8 of an inch from each end.
This will be your guide to ensure the holes in your pages and your cover matches up.
Line up the guide in the crease of your stack of pages, and mark the holes with a pencil. Remove the guide and stab holes through all of the pages.

Line the guide up with the spine of the outside cover,
keep in mind that it will be a bit shorter than the cover, so you will need to centre it a bit.
keep in mind that it will be a bit shorter than the cover, so you will need to centre it a bit.
Poke holes straight through all three layers of the cover.
The pages are not inside the book at this point.
The pages are not inside the book at this point.

Put the clipped pages inside the book so the holes match up.
Cut a piece of waxed thread approximately 3 times the height of your book.
Thread the needle, but do not tie a knot.
Thread the needle, but do not tie a knot.
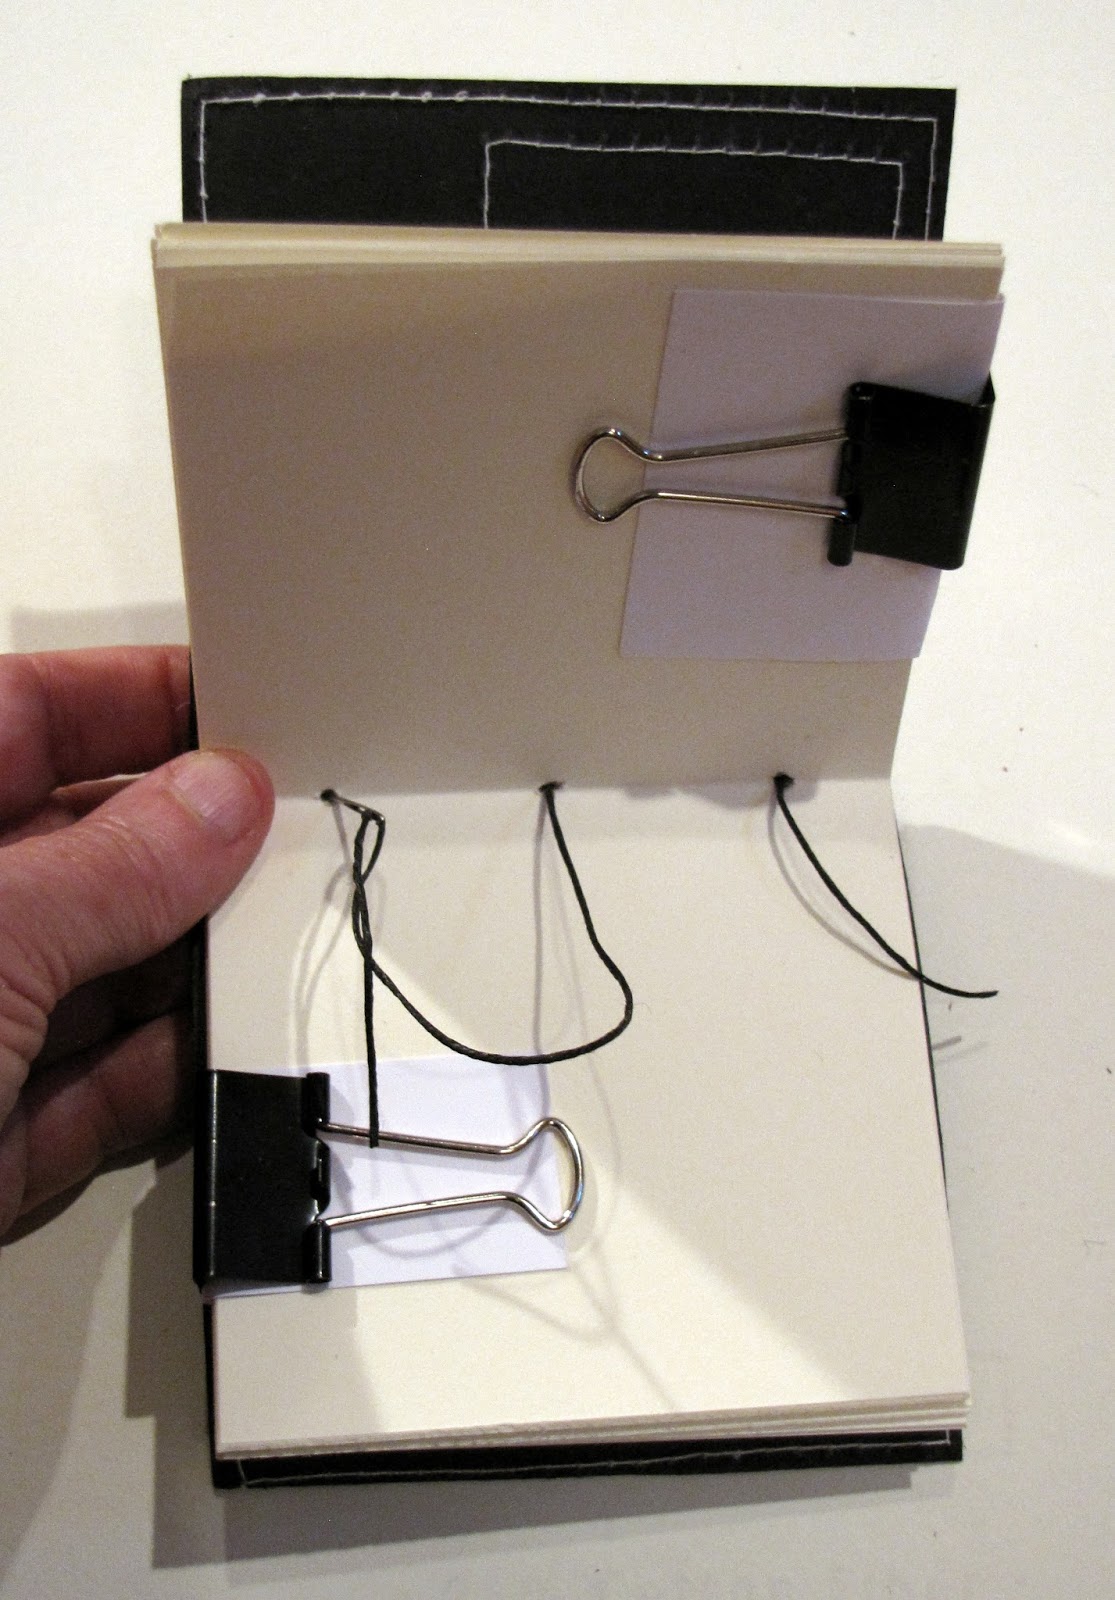
Sew from the inside top hole to the outside of the cover
and then into the middle hole and back to the outside from the bottom hole.
and then into the middle hole and back to the outside from the bottom hole.
Leave a tail at the top hole, but pull the thread tight so it holds the pages and cover together.

Sew back into the middle hole from the outside, and then pull the threads tight.
Secure it by tying together the two ends of the thread at the top of the book (on the inside).

Add another knot to secure it and trim the ends of the thread.
Remove the clips, and close the pages.
Use the back of the spoon or the bone folder to crease the pages on the inside covers.
This will help the book close more easily.
Use the back of the spoon or the bone folder to crease the pages on the inside covers.
This will help the book close more easily.

To make an elastic like closing, cut a thin strip of tire tubing
about the same length as your book when it is open.
about the same length as your book when it is open.

Feed it under the thread on the spine and wrap it around the book.

Tie it in a knot.
And the little notebook is finished.


I used orange paper on the inside cover of this book and
stitched it with a pale orange thread.
I also added a fringe decoration to the spine.
stitched it with a pale orange thread.
I also added a fringe decoration to the spine.

To make the fringe decoration, cut thin pieces of tubing,
and fold them in half over a small metal ring.
Wrap thread around the tubing just under the ring and secure it with a knot.
Add a dot of glue to the knot if needed.
and fold them in half over a small metal ring.
Wrap thread around the tubing just under the ring and secure it with a knot.
Add a dot of glue to the knot if needed.
The fringe can be added to the spine when sewing the pages to the cover.


I won't be making more of these for a while, as I am out of tire tube
(and I am not hoping for a flat tire anytime soon).
(and I am not hoping for a flat tire anytime soon).


